Week 7
Week 7 - Doing it All From the Command Line
Table of Contents
Due Dates & Links
- Lab Report 3 Resubmission - Due 10:00 pm Wednesday May 24, 2023
- Lab Report 4 - Due 10:00 pm Monday May 22, 2023
- Quiz 7 (will be released after class Monday) - Due 1:00 pm (just before class) Wednesday May 17, 2023
Lecture Materials
In-class notes
Links to Podcast
Note: Links will require you to log in as a UCSD student
Lab Tasks - Doing it All from the Command Line
This lab will be focused on doing all the tasks we’ve been doing so far solely from the command line. That means using vim for editing and the git command line tools for cloning and pushing.
Editing from the command line: vim
Log into ieng6. Run the command vimtutor. Set a timer for 20 minutes.
Complete the first two lessons (go past lesson 2 if you can in 20 minutes). Really do the exercises!
After the 20 minutes are up, clone this repository which has a subset of the code from the week 3 lab:
$ git clone https://github.com/ucsd-cse15l-s23/lab7
Then, in pairs, you are going to write down exactly the keys to press to make an edit to fix the test. You’ll share these instructions in your shared lab doc, and the next group is going to use them to try and replicate what you did.
So: Fix the program using what you learned about vim in the tutorial (as a reminder, you’re changing the index1 to index2 in ListExamples.java). Re-run the tests to make sure it works. Keep extremely accurate track of what you had to type to make this happen. You might even want to change the file back to its initial state (u is the command for undo in vim) and double-check that the instructions you are giving are good. When you’re satisfied, write down the list of keys that need to be pressed (including all uses of Backspace, Enter, Escape, and so on!) in the shared notes doc. Have one partner in your pair do this typing; the other partner shouldn’t make the edits yet because they will in the next step.
Then, go around the groups one at a time. The group to your left should use your instructions to try and make the edit, then the next group to their left will use their instructions, and so on. Watch carefully! Was each group able to? Why or why not? Did the group typing do something that didn’t match the instructions, were the instructions not complete, or did something else happen? Don’t leave any mysteries!
You can press Ctrl (or Cmd)-Shift-p and start typing “screencast” to turn on screencasting mode so others can see what you type.
Discuss and refine: After you do this, discuss how you could make the process easier. Did you have to press the arrow keys a lot? Are there vim commands that could have improved the process? How short of a key sequence can you make it to perform this edit? Can you get it under 20 keypresses including save and exit? Under 15?
If you finish quickly and want to practice more, each group can choose one of the following tasks, and repeat this whole process (design the keys to press in pairs, write them down in the notes, then go around and try the instructions one pair at a time, with others looking on and observing).
- In
ListExamples.java, change the name of thescparameter offilter, and all of its uses, to instead be calledchecker. - In
ListExamples.java, add a new line at the top of the firstwhileloop inmergethat prints out the current values ofindex1andindex2. - In
ListExamplesTests.java, add a test formergeon two empty lists.
After watching the other groups do their work, can you think of any ways to improve your instructions?
Speeding up Command Line Tasks
There are many things we can do to speed up working with the command line, making it more efficient and easy to use. Working quickly can dramatically change how difficult future programming tasks are for you, so it’s worth spending time getting better at using your tools.
In this lab, you’re going to learn how to make this process a lot easier for you. Then, you will measure your improvement as you learn to complete the command line tasks most efficiently. As you do this, check in with the people in your group to see how they are doing things more or less efficiently than you, and share tips.
Timing Tasks
These are the tasks you will be timing yourself on. As setup, Make a fork of the lab 7 repo on your Github account, so it starts as an exact copy of our repository. Before timing yourself again, make sure to delete and re-fork the repository so you’re starting from a clean state. The TAs were able to get under 5 minutes after a couple of tries.
So a run through this process will look like this. Don’t do it just yet, though. There’s a little bit of setup involved!
- Setup Delete any existing forks of the repository you have on your account
- Setup Fork the repository
- The real deal Start the timer!
- Log into ieng6
- Clone your fork of the repository from your Github account
- Run the tests, demonstrating that they fail
- Edit the code file
ListExamples.javato fix the failing test (as a reminder, the error in the code is just thatindex1is used instead ofindex2in the final loop inmerge) - Run the tests, demonstrating that they now succeed
- Commit and push the resulting change to your Github account
Generating SSH Keys for ieng6
With the setup we’ve used so far this quarter, each time you log in to your course-specific account, you have to type the password. You might have noticed that during the skill demonstration you didn’t have to type the password for our instructor accounts! Here, you’ll learn how to configure that for yourself (it will save lots of time).
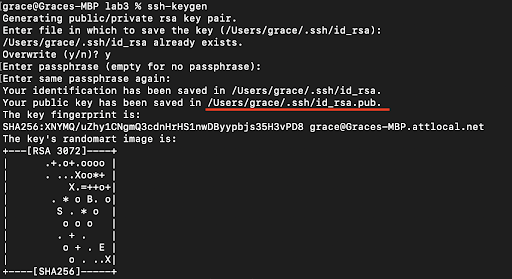
- In your local terminal, run
ssh-keygen - Keep entering
<Enter>until the program shows some text it calles the “randomart image”.- Note the path where the public key is saved (underlined below).
- Now, log into your remote course specific account on
ieng6 - Run
mkdir .sshin the terminal - Logout of your remote account
- Now, we want to copy the public SSH key you created onto your remote account, specifically inside the
.sshdirectory you just created, in a file calledauthorized_keys. - Scroll up a bit to where you were creating the SSH key, find the line where it says:
Your public key has been saved in: <path to your public SSH key>, copy the path. Make sure you get the public key file, ending in.pub, here, not the private file. - From your local computer, run
scp <path to your public SSH key> cs15lsp23__@ieng6.ucsd.edu:~/.ssh/authorized_keys- Enter password when prompted (this will be the last time you have to type it!)
- Try to log onto your remote account again, you shouldn’t be prompted for a password anymore. If you are, ask for help and carefully review the steps above with your partner.
Generating SSH Keys for GitHub
You can access and write data in repositories on GitHub.com using SSH. When you connect via SSH, you authenticate using a private key file on your local machine, which in our case will be the ieng6 machine.
Create a private SSH key file in ieng6. This is a new private key just for accessing Github from your course-specific account.
- Login to ieng6 as usual (hopefully, without typing a password now!)
- Run the command
ssh-keygen, and again press Enter until the command completes and shows the “randomart image”
Next, we want to add the public key to your Github account. This is like the step of copying the public key to authorized_keys on ieng6, but instead we’re copying to Github.
- Display the SSH public key generated above to your clipboard using
catlike below; you can copy it by highlighting and right-clickingcat <path of your ssh key .pub file>
- Open your Github account on the browser.
- In the upper right corner, click on your profile photo, then click Settings.
- In the “Access” section of the sidebar, click SSH and GPG keys.
- Click New SSH key or Add SSH key under the “SSH keys” section.
- Add a “Title” to your key (ex: Your Name’s ieng6 machine).
- Select the “Key Type” to be an Authentication Key
- Copy your public key from the output of the
catcommand and paste it into the “Key” field - Click Add SSH key.
- If prompted, confirm access to your account on Github.
Go back to the ieng6 terminal and:
- Run the following command to add Github.com as a recognized host (this avoids the scary yes/no prompt about accepting new connections the first time you connect)
$ ssh-keyscan -t rsa github.com >> ~/.ssh/known_hosts>>means “append stdout of the command to file”
- Check your connection by running the following command:
$ ssh -T git@github.com- It will say something like “Hi supercoolstudent1234! You’ve successfully authenticated, but GitHub does not provide shell access.”
Now we have an SSH key which can be used to authenticate to GitHub! In addition to using https clone URLs, we can now use SSH clone URLs that look like this:
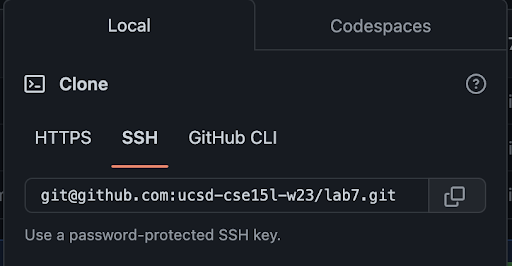
Crucially, these will allow both cloning and pushing to the repository (as long as your account has access). With this done, try cloning your fork of the lab 7 repository (make a fork if you didn’t already), then making a small change, and pushing it with the command line.
If you’re not sure how to add, commit, and push from the command line, refer to the lecture video from Monday.
Make sure you can make a change to your repository by editing, adding, and pushing all from the command line before going on!
Baseline
First, we’ll take a baseline measurement of performing the tasks above by timing yourself. Your phone may have a timer app, or you can find one by searching for online timers. The steps from above are duplicated here:
- Setup Delete any existing forks of the repository you have on your account
- Setup Fork the repository
- The real deal Start the timer!
- Log into ieng6
- Clone your fork of the repository from your Github account
- Run the tests, demonstrating that they fail
- Edit the code file to fix the failing test
- Run the tests, demonstrating that they now succeed
- Commit and push the resulting change to your Github account (you can pick any commit message!)
Write down in notes: What was your baseline time? Did your lab partner have a faster baseline than you? If so, do they have any tips to help you get started on boosting your efficiency?
Speeding Up
Now, you will explore various ways that you can speed up your work. Try all the steps below, and find out what works best (and what doesn’t work) for you!
- Using Bash History (up/down arrows)
- You can use the “up” and “down” arrows to go through the history of commands you have executed, it makes executing the same command much easier! If you run the commands you care about, then log out and back in, they are still in the command history!
- You can use Ctrl-R to search your command history. At the bash prompt, type Ctrl-R and then start typing part of a command – what shows up? Experiment with using Ctrl-R
- Using Tab
- You can use the Tab key to speed up typing commands in the command line in the following ways:
- Start typing the first few letters of a command or path. Pressing tab once will autofill the rest of the line up to the point where there are multiple potential possibilities. If you press tab a second time, it will show you all of the possibilities for what it could autocomplete to.
- You can use the Tab key to speed up typing commands in the command line in the following ways:
- Keyboard Shortcuts while editing commands
- More details at: https://www.redhat.com/sysadmin/shortcuts-command-line-navigation
- Have you had a time where you mistyped one of the commands and had to backspace all the way back to fix the problem? There’s a better way!
Ctrl-Udeletes everything from the current cursor position to the beginning of the lineCtrl-Kdeletes everything from the current cursor position to the end of the lineCtrl-Agoes back to the beginning of the lineCtrl-Egoes to the end of the lineCtrl-Wdeletes the last wordAlt-Left/Alt-Right(Windows) orOption-Left/Option-Right(Mac) to move by word- Click the “left” or “right” arrow to go to the left/right end of any selection!
- Quick Copy/Paste
- Use these keyboard shortcuts to highlight text quicker:
- Double click – selects an entire word
- Triple click - selects an entire paragraph
Alt+Shift-Left/Alt+Shift-Right(Windows) orOption+Shift-Left/Option+Shift-Right(Mac) - select multiple words
- On Mac:
Command-Cto copyCommand-Vto paste
- On Windows:
Ctrl-Cto copyCtrl-Vto paste- Right click to paste in Windows terminal
- Use these keyboard shortcuts to highlight text quicker:
New PR!
After practicing with the above, time yourself again doing the same tasks. Don’t forget to delete and re-fork the repository before timing!
Write down in notes: How much were you able to improve from your baseline?
Lab Report 4
For the lab report this week, reproduce the task from above on your own. For each numbered step starting right after the timer (so steps 4-9), take a screenshot, and write down exactly which keys you pressed to get to that step. For special characters like <enter> or <tab>, write them in angle brackets with code formatting. Then, summarize the commands you ran and what the effect of those keypresses were.
For example, when you run the tests, you might want to use the up arrow or Ctrl-R to access your bash history rather than typing in the full command with classpath, etc. You might say something like this accompanying the screenshot for running the tests:
Keys pressed:
<up><up><up><up><enter>,<up><up><up><up><enter>Thejavac -cp .:lib/hamcrest-core-1.3.jar:lib/junit-4.13.2.jar *.javacommand was 4 up in the search history, so I used up arrow to access it. Then thejava -cp .:lib/hamcrest-core-1.3.jar:lib/junit-4.13.2.jar org.junit.runner.JUnitCore ...command was 4 up in the history, so I accessed and ran it in the same way.
Add this lab report to your Github Pages site, and submit a PDF of it as usual. The Lab Report 4 deadline is Monday, May 22 by 10pm.